|
|
Dear Subscriber,
Fall is the perfect time to visit your local zoo...not too hot, not too cold.
Pro photographer Russ Burden has aimed this article at advanced photographers. (We've included a few extra tips to help beginners.)
My personal suggestion: Make your zoo adventure a family experience. You'll be amazed at the fabulous pictures even the kids will shoot.
Enjoy!
Dale
________________________________ |
 Tip #1: Lenses Can Make A Difference Tip #1: Lenses Can Make A Difference
The long lens will help you fill the frame with the subject. It can also be used to throw foreground bars out of focus when placing the lens right up to the bars and shooting with a wide open aperture.
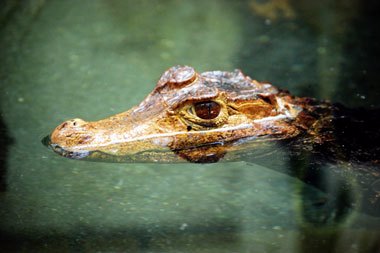
The macro comes in handy for the smaller animals residing in the indoor exhibits behind glass. If zoo rules allow you to get right up to the glass, press the lens against it to eliminate as many reflections and as much glare as possible. The closer the subject is to the glass, the better it allows you to fill the frame.
Advanced photographers: Shoot in RAW as the image will take on the color of the glass. By shooting in RAW, this cast can be corrected more efficiently using Adobe® Photoshop® or another RAW editor of your choice.
Amateurs and point-and-shoot camera users: Shoot normally using the zoom on your camera. Use manual focus (if your camera has it) when shooting through glass and the macro mode as described above. We'll do our best to filter out most of the color cast of the glass when we color correct your pictures in our laboratory.
______________________________ |
Tip #2: Use A Tripod
Most zoos don’t have tripod restrictions for shooting outside exhibits. But, they may set limitations for the indoor exhibits.
Before heading out, check into this.
A monopod may prove to be a good alternative. The tripod not only helps stabilize the lens, it also keeps your arms from getting overtired while waiting for the animal to display behavior.
_________________________________ |
Tip #3: Camera Settings
Pump
up the ISO to 400 to obtain a high shutter speed to freeze the motion
of a subject.
- If the animal is absolutely still and you’re using a
tripod, use a lower ISO setting to get better quality.
- If the light
levels drop and you need to go above 400, do so and use noise-reducing
software to get a smoother image.
With regards to aperture:
- If
you need to defocus a foreground fence, place the lens right up to it
and shoot as wide open as possible.
- When you need a
good amount of depth of field, adjust the aperture so the corresponding
shutter speed is still fast enough to freeze the movement of the animal.
Don't be afraid to use the "creative" mode settings on your camera:
Not everyone has a pro camera. But, the camera manufacturers have put a lot of thought into the creative settings. Close-up and sports settings pretty much follow the tips we're giving above. So, experiment a bit. You may be very pleasantly surprised!
_________________________________ |
Tip #4: Be Patient and Ready
When photographing any animal, it’s often better to wait for it to do something interesting or to display emotion. The resulting image will be more intriguing than just a recording of the subject lying down in its cage.
Research the feeding times. Animals tend to be more active in the hour or so before they’re fed. Be patient and you’ll be rewarded.
_________________________________ |
Tip #5: Don't Be Afraid To Use Your Camera's Manual Mode
If your background is brighter than your subject, you may need to shoot in Manual Mode and adjust your shutter speed and aperture for the best exposure.
We'd suggest spot metering and then bracketing a series of exposures to get the effect you're looking for.
_________________________________ |
Tip #6: Use Fill Flash
When the sun is out animals seek shade. That's great for them but not so wonderful for your pictures.
Use your flash as either a primary or a fill light source.
In bright sunlight your flash will open up the shadows and show more detail.
Most cameras will automatically balance the daylight and flash lighting for you. Off-camera flash units can actually light up animals as far as 40 or 50 feet away.
_________________________________ |
Tip #7: Go Back & Visit Often
Revisit the exhibits at different times of the day, as each time nets different lighting effects.
If the zoo is open late, note which exhibits get bathed in sunset light and make it a point to be there to take advantage of the sweet light.
Try different times of the year.
If you live in a cold-weather climate, go right after a fresh snow and head to the polar bear, arctic fox, or bighorn sheep exhibit.
_________________________________ |
|
A Few Lab Tips...
We give you the ability to crop your images on both our iPrints.com consumer site and iPrintsPro.com for professionals.
How you crop and print your pictures can be nearly as important as the images you take.
Paper choice is also important. You'll be amazed at the near 3D quality and brilliant color of enlargements printed on Kodak Metallic paper.
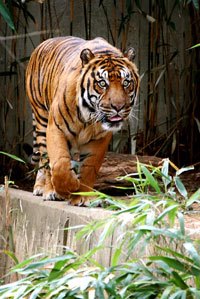
Choose Metallic paper when you have really bright colors, such as the ones we're showing here. (Shots like the peacock and tiger will look like they're jumping off the print!)
You may also want to convert some of your color images to black & white. It's as easy as clicking an option in our online ordering programs.
Your goal should always be to make your animal photographs look as if they were shot in the wild. The natural-looking habitats in today's zoos will give you opportunities for great shots. Our professionally corrected prints will bring them to life.
You snap the pictures ... we'll do the rest!
Best wishes,
Dale
Dale Farkas
President, iPrints.com & iPrintsPro.com
(Online services of Dale Laboratories)
Questions? Call (800) 327-1776.
We're here to help!
_________________________________
|
|