Photographers: Here are some easy ways to include your logo in your prints.
|
|
|
Hi ,
A common question we get from photographers is how they can include their logo or digital signature on their prints.
It's as easy as 1, 2, 3 ... Just follow these steps:
- Set Up Your Logo -
- You probably have artwork of your logo. You'll just have to convert the file to either a JPG or PNG, depending on the look you want.
- Be careful in setting the height & width dimensions of your logos. You want your logos proportioned so that they fit the print sizes you'll be ordering.
(Tip: Create a range of sizes you can import for various size prints.)
- Signatures need to be scanned on a flatbed scanner and then "cleaned up" in Photoshop. Save your signature as a PNG file.
- Select the Print Size You Want From Any Of Our ROES
Design Your Own Catalogs
- Choose from wallet sized prints to 30"x 40" on various media.
- Draw a Picture Node (For Your Logo) On Your Image in the Editing Window Using the ROES Picture Tool
- Drag your logo or signature into the picture node.
- If you want to add text, draw a text node rather than a picture node.
- Drag-and-place the picture or text node to where you want it in your composition.
Does this sound complicated? It really isn't.
Just follow the picture instructions below!
|
|
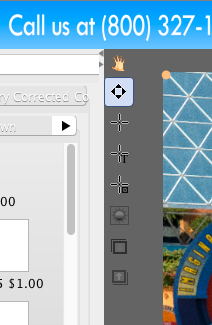
Here's a Rundown of the ROES Design Tools You'll Use
|
|
The tools run vertically on the left side of the editing window.
- The simple crosshair (3rd icon from the top) is for you to draw a picture node on your print image in the editing window.
- You'll be dragging your JPG or PNG logo into this box.
- A picture node can also be used if you'd like to have a picture within a picture on your print.
- The crosshair with the T (the 4th icon down) is for creating a text node.
- Draw a text box/node with this tool where you want your type.
- Once you have the text box in place you'll be able to use any font on your computer.
- Both picture and text nodes can be clicked on and moved around your print image using the 2nd icon down. (Highlighted here.)
|
|
|
|
|
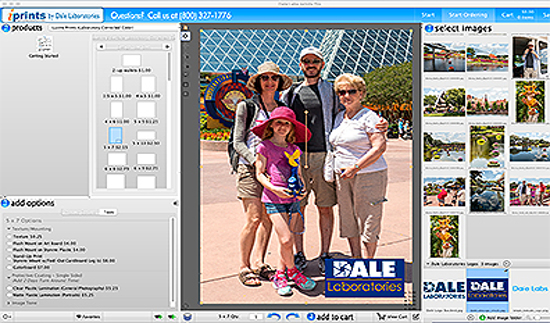
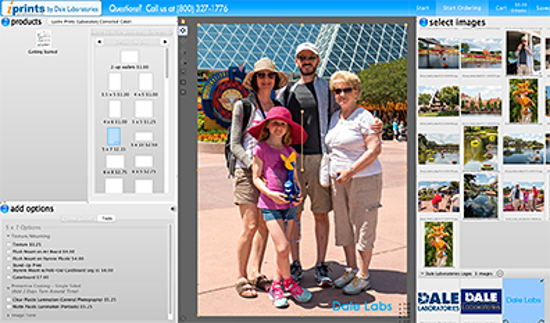
How To Bring Your Logos & Signatures Into Pictures
|
|
Import files for your logos into "select Images."
When you want the logo to stand out from the picture use a JPG file. |
|
|
|
- PNG files brought in as images will allow the photograph behind the logo to show/bleed through the image.
- Signatures should be PNG files unless you decide to place them on a solid colored background.
- If you draw a text box you'll be able to key in type with the font you choose from your computer.
|
|
|
|
How To Order On ROES -
- Visit
https://www.iprintspro.com/startingroes.php on your PC or Mac.
- Follow directions to download our ROES software into your computer.
- Look for the Design Your Own tab in all of our print surfaces.
- Take advantage of our easy-to-use templates & online tools and you'll find ordering is a breeze.
Questions? -
Call us at (954) 925-0103. Our friendly Customer Service team will talk you through setting up your print.
Please visit us in our Pro Lab store if you live in South Florida.
|
|
If You Want More From Your Photography...
Order through our
ROES site for pros & advanced amateurs or our
iPrints.com consumer site...or visit our laboratory store.
Your Creative Choices
Media & Print Sizes: Wallet Sized - 40" x 60" on Kodak pro photographic paper, canvas, art papers, metal or acrylic media.
Four (4) Kodak Paper Surfaces: Lustre/Matte, Glossy, Silk, Metallic
Delivery: Prints can be mailed to you or picked up in our store.
The Bottom Line...
Whether you're an amateur, a working pro or an artist you're
not going to find a better, more responsive photo lab in America.
We'll give you the beautiful prints & pro lab products you deserve.
|
|
|
|
|
2960 Simms St., Hollywood, FL 33020
(800) 327-1776 • (954) 925-0105
Customer Service Hours:
M - F 10AM - 5PM • Sat 10AM - 2PM
info@dalelabs.com
www.dalelabs.com
|
|
|
|
|
|
 |
|
|
|
|
|
|
 |
|
|
|
|