|
QUICK LINKS FOR ONLINE ORDERS
|
____________________
|
|
Dear ,
An important advantage of ROES
(Remote Order Entry System) pro lab software is that it makes cropping your images simple.
Yet, some pros
(and advanced amateurs) are not 100% sure about the fine points of using ROES...particularly when they need "special" print sizes.
I'd like to show you easy ways...without the need for Photoshop...to get precise crops and custom-sized prints.
I hope you'll find this information useful, either for yourself or in training your assistants.
Dale
________________________________
|
 How To Crop On Our ROES (Remote Order Entry System) Site - The Basics How To Crop On Our ROES (Remote Order Entry System) Site - The Basics
Our free ROES software is designed to make it easy to crop your pictures.
The assumption here is that photographers choosing to use ROES have a good understanding of resolution and reasonably strong computer skills. (If not, our iPrints.com consumer site is recommended.)
What you see on your monitor is what you'll get on your prints, enlargements or other pro products.
(However, we suggest not cropping too tightly as 1/8" will be cropped from your image to allow for printing machine variations.)
Please click here to start ROES or download our ROES software. If you'd like easy step-by-step instructions on how to use ROES just click here.
Here's a rundown of basic cropping:
The way ROES works is that a thumbnail image of your picture is dragged by you into a predefined size template.
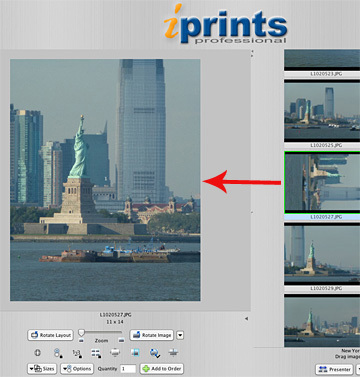 |
The editing window is on the left, the thumbnails to the right and
tools on the bottom. Just drag images from right to left. |
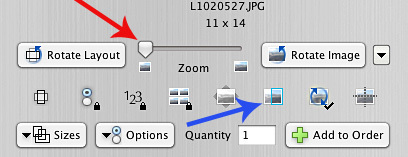 |
| The Zoom Slider Tool (red arrow) and the Crop or Fit button (blue arrow.) |
- A zoom slider tool (red arrow) is used to increase the size of your picture within the editing template.
- Then, click on the picture to move the image around and place it aesthetically within your composition.
 |
When you click the Crop or Fit button white bars show on
your picture's edges. |
- Clicking on the Crop or Fit button (blue arrow) sets the zoom tool to zero and fits your full image within a traditional print size.
Here is an example of this picture with no zooming. I've placed the image into the 11 x 14 template, cropping out the sky area and some of the water on the top and bottom:
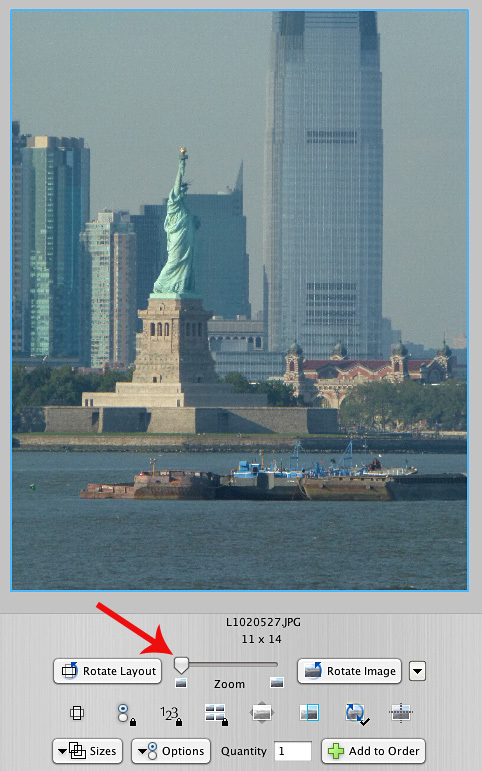 |
| Minimal cropping with Zoom Tool at zero. |
Now, I've moved the Zoom Tool to the right to capture just the Statue of Liberty:
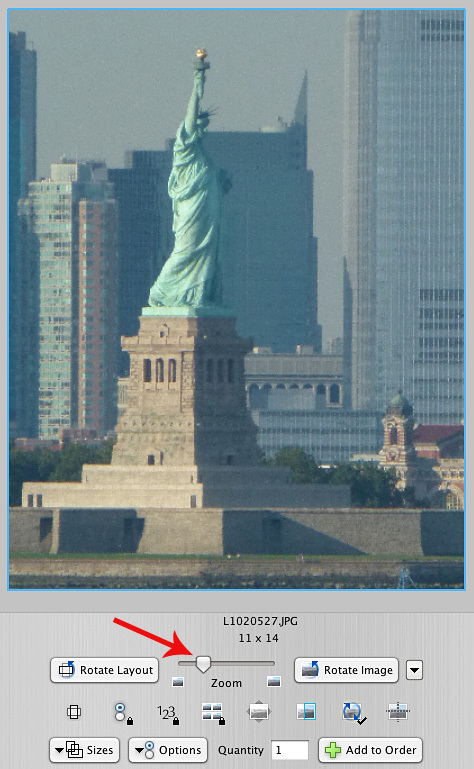 |
Cropped picture made by sliding the Zoom Tool to the
right & placing the photo within the frame. |
Use Options To Enhance Your Enlargements...
You can expand on how your enlargement is treated by clicking on the Options button. This button is located at the bottom left of the Editing Window. When the window is open, click to select texturing, mounting or other available options.
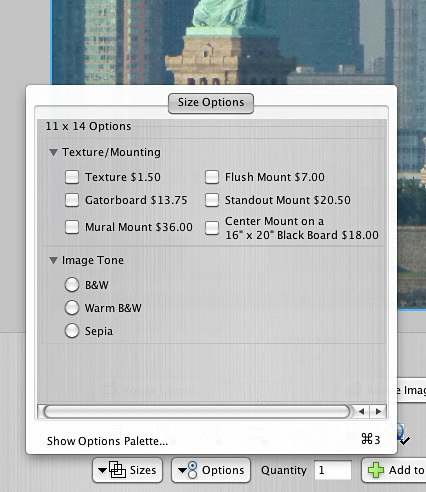 |
Clicking on any Option box will add special
treatments to your print. |
Resolution, color space and tech details...
- Resolution should be at 300ppi (200ppi minimum) at the size you're printing. Use Photoshop or Photoshop Elements to show your ppi if you have any doubts about your image's resolution or file size.
- Use sRGB color space; not AdobeRGB.
- Embed your color profile. (i.e. sRGB IEC6191966-2.1)
- Submit JPEG files. Please convert TIFFs or RAW files to JPEGs.
- Name your files with proper Windows protocol. Avoid dashes, underscores and special symbols, which can cause your order to "error out."
- If any of this sounds like Greek, please call us at (800) 327-1776 and we'll talk you through the technical stuff!
_________________________________
|
How to Order a Non-Standard Print Size
A question we regularly receive is how to order a print size that we
don't offer.
For example, your client may have an old frame that she wants to use for a new photograph.
Let's assume you need a print size of 10 1/2" x 13". This certainly isn't a standard lab size. But, there's no reason you can't create and order the size in just a few minutes.
Here's a quick and easy way to get exactly the print size you need:
You'll select a slightly larger standard print size than the size you need. We'll be printing on that larger sized sheet. For this example...a 10.5" x 13" print...the closest size is 11" x 14". So, you'll be placing your custom-sized layout on an 11" x 14" photographic print.
- Start by clicking the Design Your Own tab on within the paper surface (catalog) you want.
- Click on the 11" x 14" template icon. An 11" x 14" image node will open in the left design window.
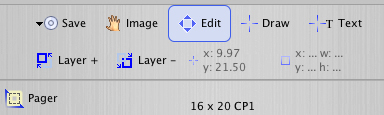
- Click the Pager icon on the lower left.
You'll see the Pager's tools open under the design window.
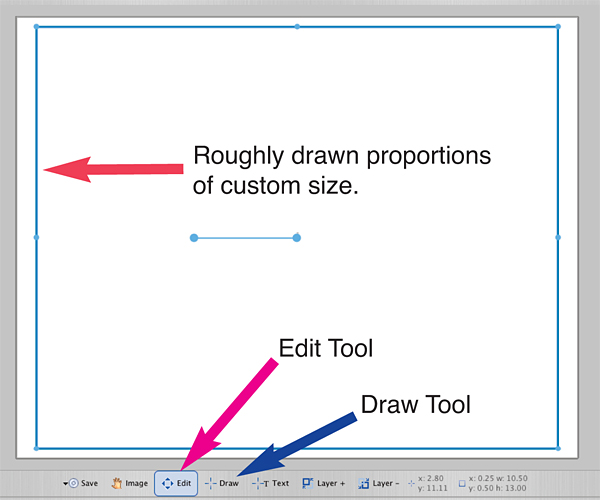
- Click on the Draw tool. Then, go into the design window and draw a rectangle that is
approximately the dimensions you want (10.5" x 13"). Your rectangular box does
not have to be exact.
- Now, click the Edit tool. Place your cursor in the image box and right-click your mouse to open a drop-down menu.
-
Click on Node Bounds... and another drop-down window will open. It will have the x and y coordinates plus the dimensions of the
rough-drawn picture "node" you have created.
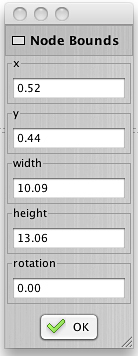
- Fill in the drop-down fields with the correct dimensions in inches:
- Width will be 10.50
- Height will be 13.00
- x will be .25
- y will be .50
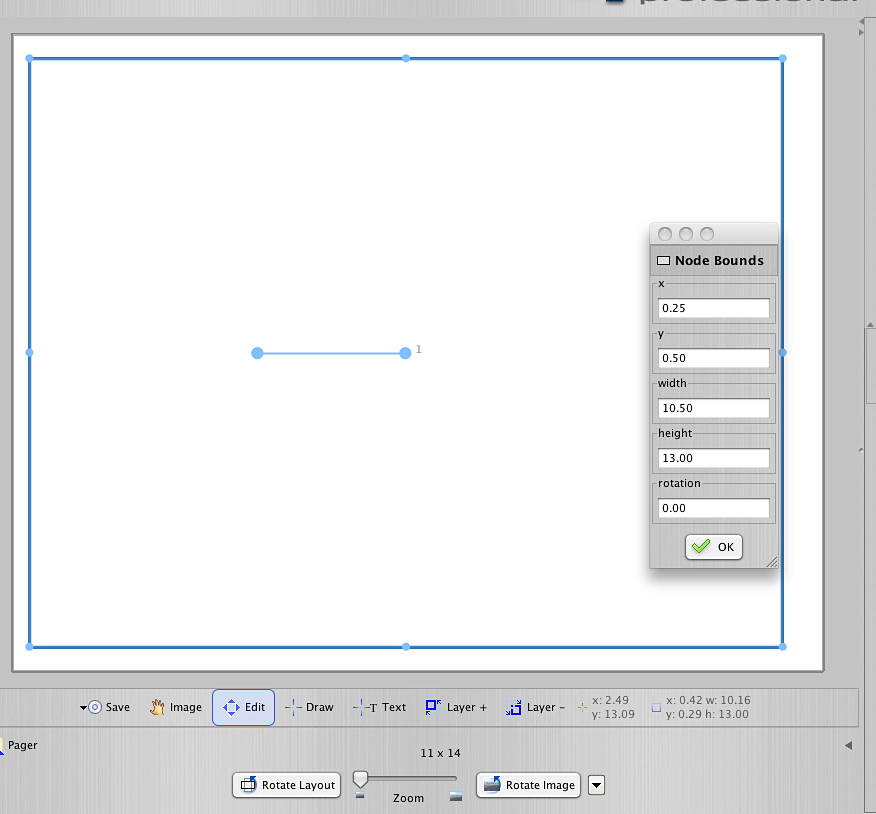 |
| Key in the Correct Measurements and Click OK |
- If you don't want to do the x & y placement arithmetic just fill in the width and height, and click OK. Then, click the Edit tool and, after moving the cursor inside the picture node, position your sized template visually within the full print area to allow even white space on the borders.
- Click the OK button on the Node Bounds window to reset the size of your template.
- Optional - You may want to save your set-up for the 10.5" x 13" print for future use.
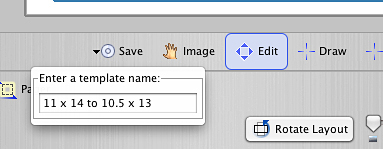
- Click the Save tool on the far left.
- Fill in a description after the 11 x 14 size name.
(i.e. After the 11 x 14 in the description, key in 11 x 14 to 10.5 x 13 to name your special template.)
- Hit Enter on your keyboard.
- Your new 10.5" x 13" template will appear in My Templates. It will be available any time you want with just a click of your mouse!
- Click the Pager icon on the left to turn off the Pager tools.
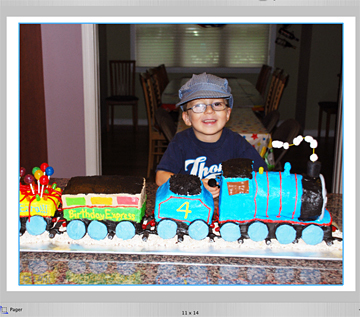
At this point you can treat this as any other print template. Drag-and-drop your image into the picture node and use the zoom and placement tools to crop within your custom print dimensions.
Here's our finished layout with a picture that has been dragged in:
We'll be happy to trim the white borders that will show on the edges of your custom-sized prints. When checking out please key in your request in Instructions... and we'll cut your prints to size at no charge.
_________________________________
|
If You Don't Live In Florida:
Orders sent to you from our laboratory via U.S. First Class and Priority Mail will usually arrive at your studio or home in 2 - 4 days ... no matter where you are in the U.S. (Not much longer for Canada.)
Digital In - Mail Out ... For the Best Enlargements In America
Lab turn-around times for online digital proofing & enlarging orders (M - F if received by 3:00 PM EDT):
- iPrintsPro.com (ROES) -
- Studio Corrected (where you do your own color corrections) - 1 to 2 hours
- Laboratory Corrected (where we correct your color) - 1 to 2 days
- Mounting - Add 1 day
Expedited Shipping Via UPS Is Also Available
_________________________________
|
I'd appreciate your input on whether this and other emailed newsletters are meeting your needs.
Please email your comments and suggestions to info@dalelabs.com. I'll send you a personal reply.
I hope you'll let us assist you in reaching all your professional goals.
When you succeed ... we succeed!
Best wishes,
Dale
Dale Farkas
President, iPrintsPro.com
(Online service of Dale Laboratories)
Questions? Call (800) 327-1776. We're here to help!
_________________________________
P.S. Many of our photographers have found our Monitor Calibration tool to be very useful. Please click here for a download. Call us to receive a complimentary match print.
Liking us on Facebook is a great way to take advantage of non-published sales and to learn about new products.
|
|